How to Increase and Decrease Stitches Evenly in Knitting and Crochet
A practical method guide for evenly spacing increases and decreases, with transparent arithmetic, worked examples, and when to use a calculator for exact distribution.
Maggie

A practical method for resizing knitting patterns when your swatch gauge doesn't match the pattern, including worked examples, repeat constraints, and construction risks.
When your actual gauge differs from a pattern's gauge, you can often resize by scaling stitch counts proportionally—but only when the pattern's construction, repeats, and shaping allow it. Multiply pattern stitches by (your gauge ÷ pattern gauge), check that repeats divide evenly, verify row gauge separately, and watch for risks at armholes, necklines, and sleeve caps where simple scaling breaks down.
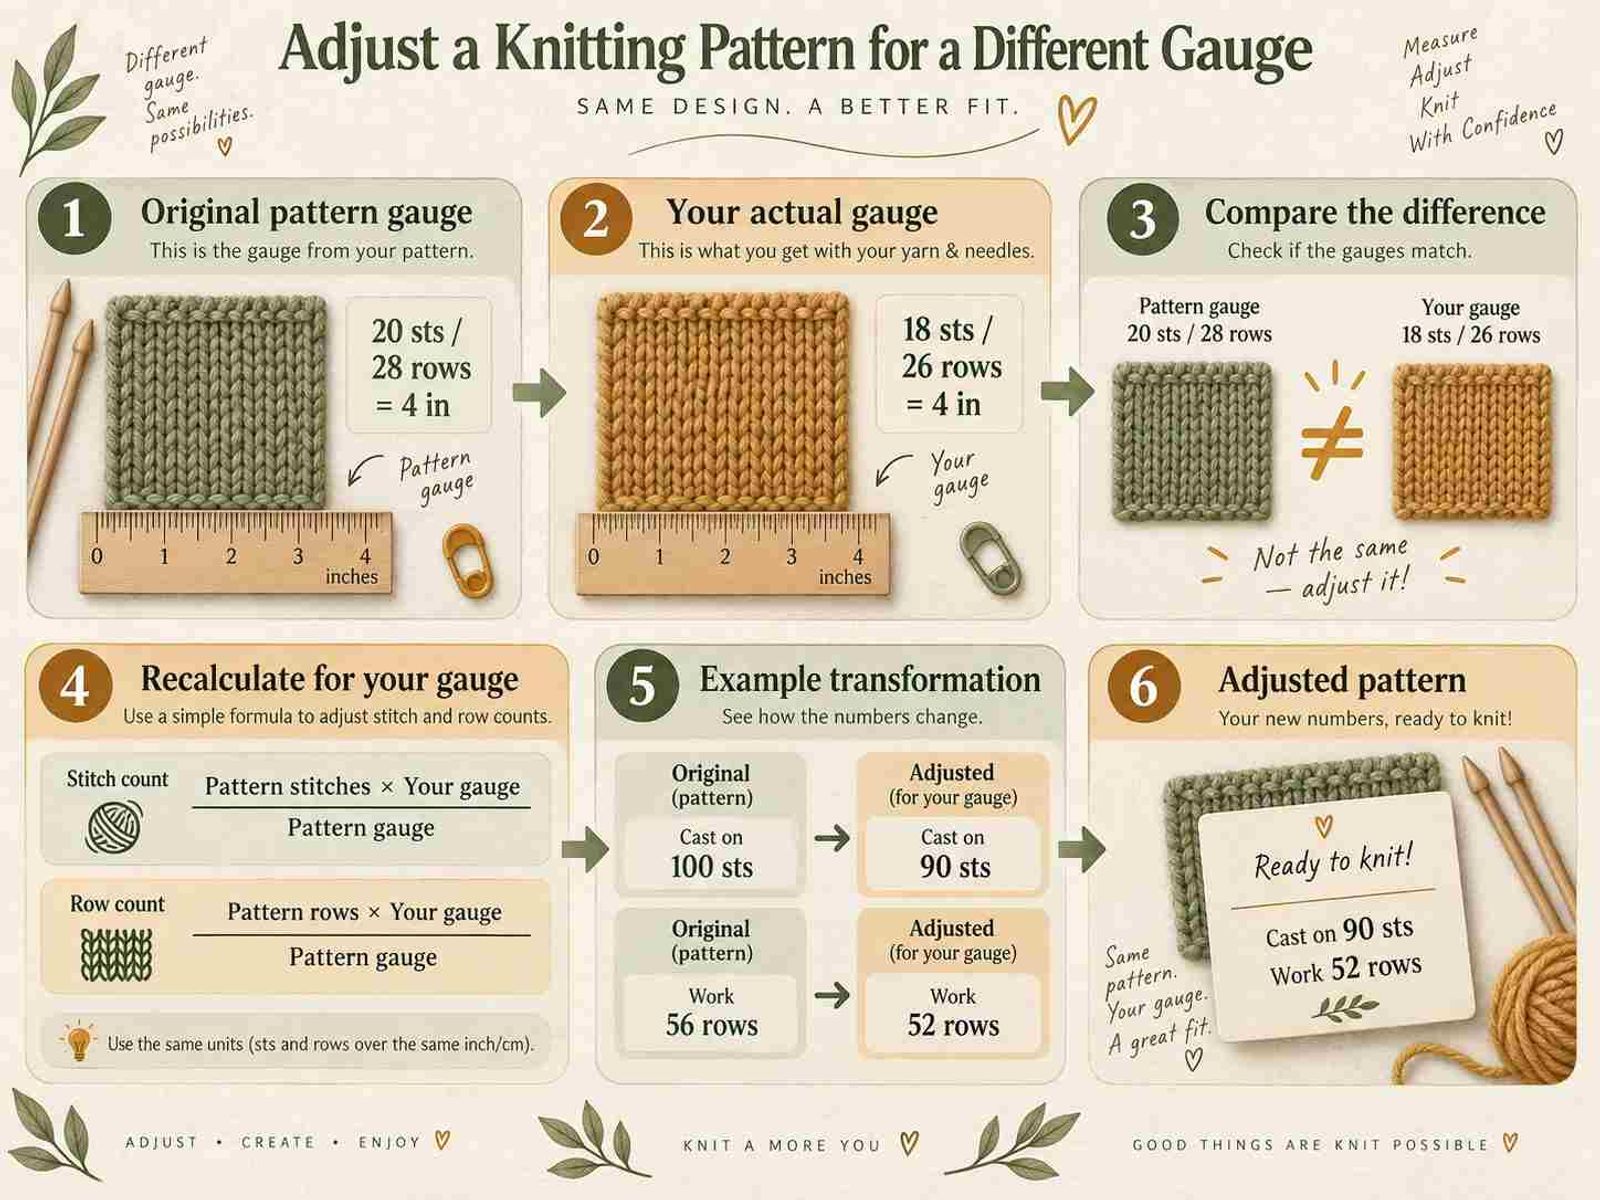
You finally found the right yarn. The color is perfect, the drape is exactly what you wanted, and your swatch feels like fabric you actually want to wear. Then you count: 20 stitches over 4 inches. The pattern says 18. Two stitches doesn't sound like much—until you realize that on a 40-inch sweater chest, that's 22 extra stitches, adding nearly 5 inches of width. Follow the pattern blindly and you'll knit a garment for someone else entirely.
The good news: gauge differences are solvable. The work is in knowing when simple math is enough, and when the pattern's architecture fights back.
Stitch count, gauge, and finished dimension travel together. The pattern gives you one point on that triangle; your swatch gives you another. The formula that connects them is straightforward:
Adjusted stitch count = Pattern stitch count × (Your gauge ÷ Pattern gauge)
Both gauges must use the same unit—stitches per inch or stitches per 4 inches/10 cm. Mixing units is the most common silent error in hand calculations.
This ratio is the engine behind every resize. If you knit 20 stitches per 4 inches and the pattern expects 18, your multiplier is 20/18 = 1.111. Every stitch count in the pattern gets scaled by that factor. ThePattern Resize Calculatorhandles this arithmetic, but understanding the logic protects you from applying it where it doesn't belong.
Pattern gauge: 18 stitches per 4 inches (4.5 stitches per inch) Your gauge: 20 stitches per 4 inches (5 stitches per inch) Pattern back width at underarm: 90 stitches
Step 1: Calculate the multiplier 20 ÷ 18 = 1.111
Step 2: Apply to body stitches 90 × 1.111 = 100 stitches (round to nearest whole number: 100)
Step 3: Check the math backward 100 stitches ÷ 5 stitches per inch = 20 inches 90 stitches ÷ 4.5 stitches per inch = 20 inches
The width is preserved. The fabric is yours; the dimension is the pattern's.
Stitch gauge and row gauge rarely shift in lockstep. A knitter might match stitch gauge perfectly while row gauge runs 6 rows per inch against the pattern's 5.5. This matters enormously for vertical measurements: armhole depth, sleeve length, yoke depth, and any instruction that says "work until piece measures 8 inches" or "work 32 rows."
For measurements given in inches or centimeters, ignore row gauge and use a tape measure. For instructions given in rows, you need a second multiplier:
Adjusted row count = Pattern row count × (Your row gauge ÷ Pattern row gauge)
If your row gauge is tighter (more rows per inch), you'll work more rows to cover the same vertical distance. This is where many resized garments fail: the armhole becomes too shallow, the sleeve cap too flat, because the knitter adjusted stitches but not rows.
Patterns rarely use arbitrary numbers. A 90-stitch back might exist because the stitch pattern repeats every 10 stitches, plus 2 edge stitches, plus a center panel of 18. Scale blindly to 100 and you may break the repeat structure.
Decision process for repeats:
Example: A pattern with a 12-stitch cable flanked by 6-stitch seed panels, repeated across 90 stitches. The cable repeat is 12 + 6 + 6 = 24, but with edge stitches the math may not divide evenly at 100. You may need 96 stitches (4 full repeats) or 108 (4.5 repeats, if the half-repeat is specified in the pattern). The pattern's structure, not your target number, wins this negotiation.
Some garment sections resist proportional resizing. Know these before you start:
Section — Risk — Why
Armhole shaping — HIGH — Curves and ratios are tuned to original row/stitch relationship
Neckline shaping — HIGH — Depth and width interact; scaling one without the other distorts fit
Sleeve cap — HIGH — Cap height and armhole circumference must match; independent scaling breaks armscye geometry
Set-in sleeve width — MEDIUM — Sleeve cap ease is calculated for original gauge
Raglan increases — MEDIUM — Increase rate depends on row-to-stitch ratio; changing one without the other skews angle
Straight hems/ribbing — LOW — Simple rectangles tolerate direct scaling
Body tubes (no shaping) — LOW — Circumference scales directly if repeats allow
When you hit a high-risk section, you have three options: work the pattern's original numbers at your gauge (accepting different finished dimensions), recalculate the shaping curves using your gauge (advanced, requires understanding of construction geometry), or choose a different pattern better suited to your gauge.
Decrease and increase rates need recalculation when row gauge shifts. A pattern that decreases 1 stitch every 4 rows to shape an armhole assumes a specific angle. If your row gauge is tighter, every-4-rows becomes a steeper angle. You may need every 5th or 6th row to preserve the same slope.
The formula for equivalent decrease spacing:
New decrease interval = Pattern decrease interval × (Your row gauge ÷ Pattern row gauge)
Round to the nearest whole row, then verify the total decrease count still matches the required stitch reduction. If it doesn't, distribute the remainder evenly across the shaping section.
Some situations make gauge adjustment the wrong tool:
Once you've verified your swatch is accurate, measured over at least 4 inches in pattern stitch, and identified which sections of the garment can safely scale, thePattern Resize Calculatorexecutes the arithmetic. Input your gauge and the pattern gauge; it returns scaled stitch and row counts. Use theGauge Calculatorfirst if you need to convert between stitches-per-inch and stitches-per-10cm.
The calculator handles the math. You handle the judgment about where that math applies.
Mixing units. 18 stitches per 4 inches is 4.5 stitches per inch. Using 18 and 4.5 in the same formula without conversion gives nonsense results.
Ignoring row gauge. A garment can be the right width and entirely the wrong length. Measure vertically, don't assume.
Rounding too early. Round only at the final stitch count for each section, not the multiplier itself. 1.111 × 90 is 100; rounding 1.111 to 1.1 first gives 99, which may break repeats.
Forgetting ease. The pattern's finished measurements include ease. Your resized garment should preserve the same ease, not match your body measurement exactly.
Knit a generous swatch in the pattern's primary stitch. Wash it, block it, and measure carefully. If your gauge differs from the pattern, work through the checklist above, identify which sections scale safely, and use thePattern Resize Calculatorfor the arithmetic. Start with a simple section—a straight body panel—to build confidence before tackling shaped areas. If the armhole or sleeve cap math feels uncertain, that's your signal to seek a pattern closer to your natural gauge rather than force a resize that fights the garment's engineering.
A practical method guide for evenly spacing increases and decreases, with transparent arithmetic, worked examples, and when to use a calculator for exact distribution.
A plain-language guide to reading pattern math: what 'multiple of 4 + 2' actually means, how to separate repeat stitches from edge stitches, and how to check your work.
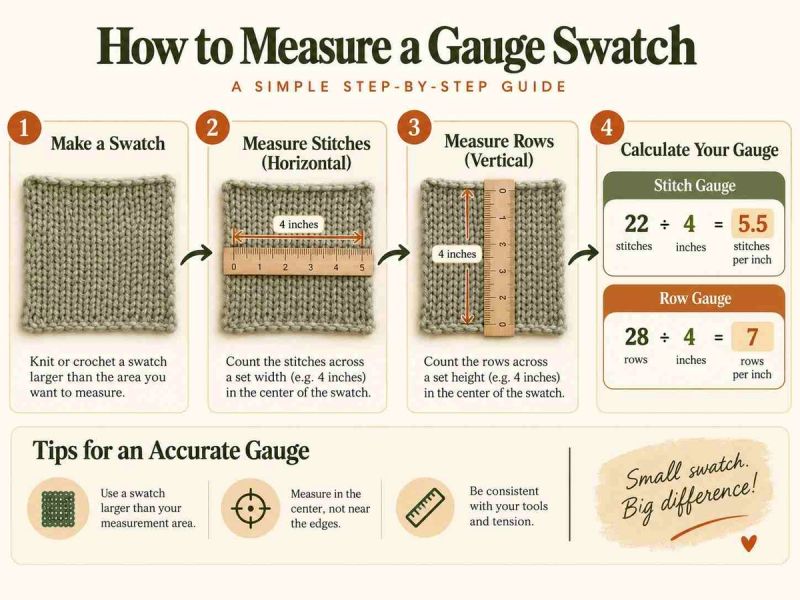
A step-by-step guide to measuring knitting gauge swatches correctly, with worked examples and troubleshooting for common measuring mistakes.
Something look wrong? Report a calculation or content problem.